Roof Leak Detection Milwaukee – Infrared & Hidden Leak Experts
The Leak Isn't Where the Water Shows Up
That stain in your bedroom ceiling? The actual leak is probably fifteen feet away. Finding it takes experience, not guesswork.
Holland Exteriors provides professional roof leak detection services in Milwaukee and surrounding areas. For roof leak detection in Milwaukee, we perform leak inspection, water intrusion tracing, infrared roof scan analysis, roof moisture detection, and targeted leak repair planning. We trace water intrusion, pinpoint the exact leak source using infrared scanning and visual inspection, then provide roof leak repair recommendations. Licensed, insured, BBB A+ rated. Call (414) 340-3890 for a free assessment.
Three Contractors Looked. None Found It.
Robert Mitchell had a water stain in his upstairs bedroom. Three different contractors came out. All three said, "It's the flashing around your chimney." Two of them replaced the flashing.
Two months later, after the next heavy rain, the stain was bigger.
When Jaime Holland climbed onto Robert's roof, he didn't go straight to the chimney. He followed the water. The stain was near the west wall. The chimney was center of the house. Water doesn't run uphill.
The actual problem? A nail that missed a rafter during installation—twelve feet from where the water showed up inside.
Water enters at one point, travels along rafters or between layers, and shows up somewhere completely different. Finding the actual source requires understanding how water moves through roof assemblies.
We don't guess. We trace. We use infrared cameras to find hidden moisture. We look at roof slopes, understand water flow patterns, and find the exact entry point. Then we fix that spot—not everything between the entry point and where you see the stain.
Roof Leak Detection Methods: Leak Inspection, Infrared & Moisture Mapping
Water Flow Analysis
We understand how water travels through roof systems. The leak is usually uphill from the stain.
Infrared Scanning
Thermal imaging reveals hidden moisture in insulation and decking before it causes visible damage inside.
Systematic Inspection
We check all penetrations, flashings, valleys, and vulnerable areas in the likely water path.
Photo Documentation
We show you exactly where water is entering and explain why it's showing up where it is inside.
Common Hidden Leak Sources
- Failed Flashing
Around chimneys, skylights, vents, and wall intersections—the #1 source of roof leaks
- Valley Problems
Roof valleys channel massive water flow. Small defects become big leaks fast
- Penetration Seals
Plumbing vents, exhaust pipes, and roof-mounted equipment often have deteriorated seals
- Installation Errors
Missed nails, improperly sealed shingles, and shortcuts that create leak paths
- Ice Dam Damage
Previous ice dams can lift shingles and compromise seals, creating leaks during rain
Common Causes of Roof Leaks in Milwaukee
After 20+ years of tracking leaks in Milwaukee homes, we've identified the most common culprits. Knowing where leaks typically originate helps us find yours faster:
#1: Flashing Failures (42% of leaks)
Flashing—the metal pieces that seal roof transitions—is the most common leak source. Around chimneys, skylights, walls, and vents, flashing can corrode, separate, or be improperly installed. We see these failures constantly.
#2: Valley Problems (18% of leaks)
Roof valleys channel enormous amounts of water. Improper valley installation, debris accumulation, or worn valley metal creates leak paths. Complex roofs with multiple valleys are especially vulnerable.
#3: Vent Pipe Boots (15% of leaks)
Rubber boots around plumbing vents deteriorate from UV exposure and Wisconsin's temperature swings. After 10-15 years, these boots crack and allow water entry. Often overlooked during basic inspections.
#4: Ice Dam Damage (12% of leaks)
Ice dams lift shingles and force water underneath. Even after the ice is gone, the damage remains. Many "spring leaks" are actually winter ice dam damage finally showing up.
#5: Shingle Deterioration (8% of leaks)
Cracked, curled, or missing shingles allow water entry. Storm damage, age, and poor ventilation accelerate shingle failure.
#6: Installation Errors (5% of leaks)
Nails that missed rafters, improperly overlapped shingles, incorrect underlayment—installation shortcuts create leaks that can appear years later.
How We Find Roof Leaks
Finding a roof leak isn't about looking at where water appears inside—it's about understanding how water got there. Our systematic approach combines technology with experience:
Step 1: Interior Assessment
We start inside, examining water stains, noting their location, and understanding when leaks appear (heavy rain, wind-driven rain, snowmelt). This tells us where to focus our roof examination.
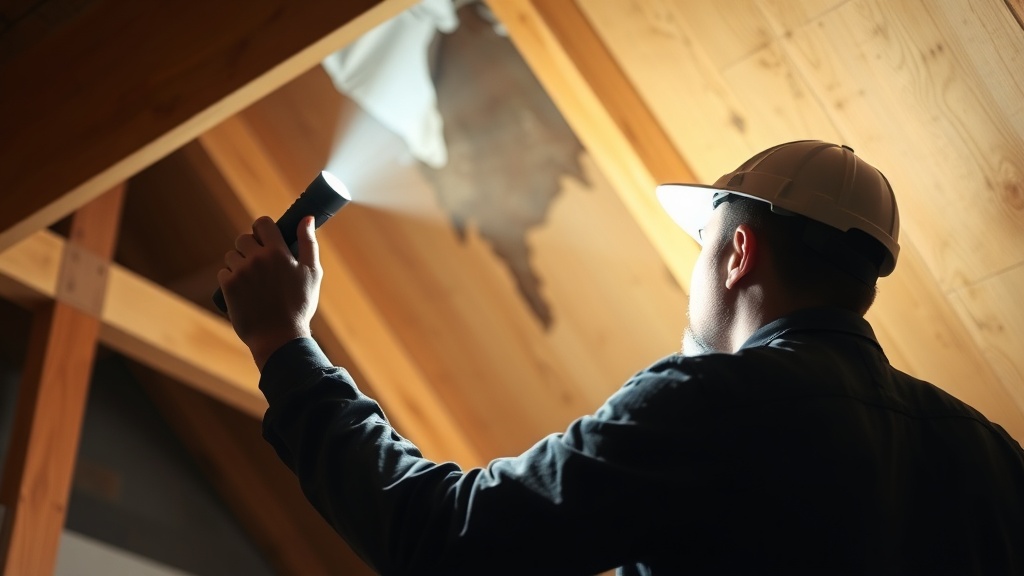
Step 2: Attic Inspection
If accessible, we inspect your attic with flashlights and, when needed, infrared cameras. Water leaves trails—stained rafters, discolored insulation, daylight visible through penetrations. We trace these trails to their origin.
Step 3: Roof Surface Examination
Using our knowledge of water flow patterns, we examine the roof areas most likely to be the source. We check:
- •All flashing around chimneys, skylights, and walls
- •Roof valleys and their underlayment
- •Plumbing vent boots and exhaust penetrations
- •Shingle condition along the water path
- •Ridge caps and hip shingles
Step 4: Infrared Thermal Imaging
Thermal imaging reveals moisture invisible to the naked eye. Wet materials have different heat signatures than dry materials. This technology:
- Finds hidden moisture in insulation and decking
- Shows the full extent of water infiltration
- Identifies problem areas before interior damage appears
- Works best in evening when sun hasn't heated the roof
Step 5: Water Testing (When Necessary)
For elusive leaks, we methodically apply water to suspected areas while monitoring inside. This simulates rain conditions and confirms the exact entry point.
Step 6: Documentation & Explanation
We photograph the leak source and show you exactly what's happening. We explain how water is entering, where it's traveling, and why it's appearing where you see it. Then we discuss repair options and costs.
Roof Leak Repair Cost in Milwaukee
Leak repair costs depend on the source, extent of damage, and complexity. Here's what Milwaukee homeowners typically pay:
| Leak Source | Typical Repair | Cost Range |
|---|---|---|
| Pipe boot failure | Replace rubber boot | $150-$350 |
| Minor flashing issue | Reseal or patch flashing | $200-$500 |
| Damaged shingles (small area) | Replace damaged shingles | $250-$600 |
| Major flashing repair | Replace chimney/skylight flashing | $500-$1,500 |
| Valley repair | Replace valley metal and shingles | $800-$2,000 |
| Decking damage | Replace rotted decking + roofing | $1,000-$3,000+ |
What Affects Leak Repair Cost
- How long the leak has existed: Longer leaks cause more hidden damage (rot, mold, insulation damage)
- Accessibility: Steep roofs, complex roof designs, and hard-to-reach areas add labor
- Shingle matching: Discontinued shingles may require replacing larger sections
- Multiple issues: One visible leak may have multiple contributing factors
Leak Detection is Free
We don't charge for finding your leak. Our inspection, including infrared scanning when needed, is free. You only pay when we fix the problem—and you'll know the exact cost before we start.
Signs You Have a Hidden Roof Leak
Visible ceiling stains are obvious. But many leaks cause damage for months or years before showing obvious signs. Watch for these warning signals:
Inside Your Home
- Musty odors: Especially in upstairs rooms or near exterior walls—mold growing from hidden moisture
- Paint bubbling or peeling: On ceilings or walls below the roof line
- Ceiling texture changes: Sagging, warping, or texture that looks different
- Unexplained spots on walls: Water may travel down walls from roof entry points
- Higher energy bills: Wet insulation loses effectiveness
In Your Attic
- Daylight through roof boards: Light shouldn't be visible through the decking
- Dark staining on wood: Rafters, decking, or trusses with water marks
- Mold or mildew: Black, green, or white growth on wood or insulation
- Wet or matted insulation: Insulation should be fluffy and dry
- Rust on metal components: Nail heads, straps, or hardware showing corrosion
On Your Roof
- Shingles that look different: Curled, cracked, or discolored sections
- Granules in gutters: Excessive granule loss indicates shingle deterioration
- Visible flashing gaps: Separated or lifted metal around penetrations
- Moss or algae growth: Can trap moisture and work under shingles
The Cost of Waiting
A $300 leak repair becomes a $3,000 problem when left unaddressed. Water damages insulation, rots decking, promotes mold growth, and can even compromise structural framing. If you suspect a leak, get it inspected immediately.
Frequently Asked Questions About Leak Detection
Stop Guessing. Find the Actual Leak.
Every day you wait, that leak is causing more damage. We'll find the exact source and fix it right the first time.
Schedule Leak Detection: (414) 340-3890